July 8, 2012

Sunni Halter Top & Giveaway {my first giveaway!!!}

Welcome!  It's great to be back {although time away from blogging spent with the kiddos and hubby was nice too}.


I'm so excited about my "comeback" post, and even more excited to be doing my first giveaway...


Recently I had the opportunity to "test" sew a new pattern by Seamingly Smitten Sewing Patterns.  It's called the Sunni Halter Top, and it turned out awesome!


Bear with me...modeling isn't really my "thing"...
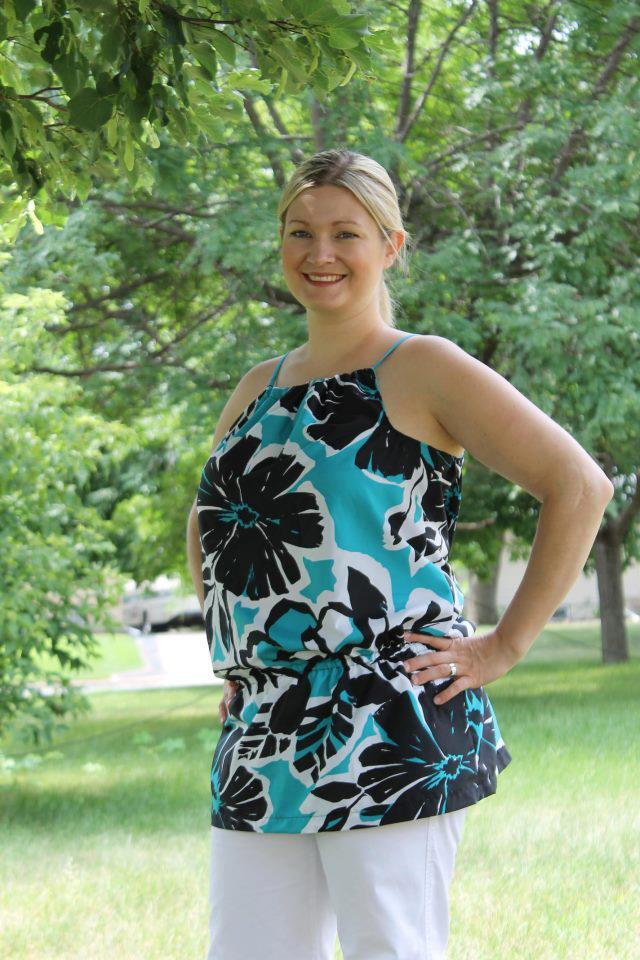
I had bought the fabric on super sale early in the summer {late spring} at Joann's with the intention of making a summer top, but didn't get around to it.  So when I got this pattern I knew it was a perfect match. It's a very versatile top, you can dress it up, dress it down, wear it with jeans, dress pants, leggings, and on and on!


The pattern was so easy to follow, and had very clear directions.  It's great for anyone sewing on a beginner level on up!

Seamingly Smitten Sewing Patterns offer stylish and trendy sewing patterns for women and children.  Want one or TWO for yourself???


Here is your chance...


I'm so excited for this...my first giveaway!!! 


So excited that I'm not only going to give one lucky follower, but two lucky followers each TWO patterns of their own!


Here is what you need to do to enter...
1.  Follow me...  being mom{me}
2.  LIKE Seamingly Smitten - sewing patterns on Facebook
3.  Leave a comment for each step you've done on this post including your email address or make sure it is linked to your profile

Giveaway ends Thursday, July 12th at 9 PM CST.  The winners will be announced the following day or so.

Best wishes,
-R.

June 29, 2012

Fantastic Friday {time for a bloggy makeover?}

Wowzers!!! 

In the short couple of months that I have been blogging I am astonished to see {i can read stats} that I have had well over 1000 {yes, one thousand} visits to my blog!  That may be "peanuts" to some bloggers, but for me it's a pretty decent deal. 

{Maybe there are a couple of lone souls who continuously visit me out of pitty...hopefully not!}

Regardless, I am humbled...Thank YOU!

Seriously, I would LOVE to know where all you "visitors" are visiting from...leave me a comment if it's not too much to ask.  Please...

That said I've really been thinking about giving my blog a "face lift", since I do believe I'm going to stick around for a while.  The blogger templates are nice {ahem...fine...adequate}, but a girl like me needs a little bit of "punch"...something a bit more.

Honestly, I have no clue how to do my own custom blog design...I'm sure with {a lot} of time {which I don't have}, a few mistakes, and a couple of {choice} words I could figure it out.  But, rather than go through the pain I've been thinking about finding someone else to do it for me...

One option I came across is Melissa Rose Graphic Design Studio.  She does custom designs, but she also has a number of awesome pre-designed blog templates along with many other products.

I'm kind of keen on this one...

She also happens to be doing a "giveaway"...for her one year blog anniversary.  Which of course I entered...and have crossed my fingers...and my toes...and those of all of my children...hoping that I win!!!


Interested in a chance to win for yourself?  {I can't believe I am decreasing my chances of winning by sharing this...just kidding!}  Hop on over to her blog 20 going on 80.  You can get there by clicking here.

Good luck!!!

June 28, 2012

Fire Cracker Hair Bows {a mini tutorial}

The other night when I stopped at the dollar store for organizing bins, spools and spools of ribbon caught my eye.  They had 6 yard spools of ribbon for only $1 {imagine that}.


I picked up a few spools to make hair bows for my girls.  I decided to "copycat" a hair bow that I had bought a while ago at Gymboree {I'm ashamed to admit that I paid $8 for}.  It was simply a hair elastic with multiple  pieces of ribbon attached.

I've turned to making hair "stuff" for the kids because they are notorious for losing their ribbons, bows, and headbands, or simply giving them away to friends...wouldn't you know the $8 Gymboree bow is of course one that is MIA.

These were super simple to make.  I finished three of them in 15 minutes.  {one escaped before I could get it in the photo...kids!}


Here are the supplies you will need:
ribbon
hair ties {ponytail holders}
scissors
needle & thread
fray check {I suggest using for the ribbon ends}


I started out cutting a number of strips of ribbon each 12 inches long.  I did about 7 to 8 strips for each hair bow.  The more strips of ribbon, the more "full" it will be.

I divided my ribbon strips into two piles, and found the center of each pile by folding it in half.  

I then simply laid half of the strips across a hair tie {ponytail holder} and hand sewed around and around to attach the ribbon.  Then I took the other half of the ribbon strips {turning them to make an x with the other strips} and hand sewed to attach them as well.


After attaching all the ribbon, you're done! Now if we can just keep them in our possession until the fourth...


I appreciate you stopping by!
-R.

Linking up to:

June 27, 2012

Crafting with the Kiddos {freezer paper stenciling}

My little "chickens" love doing crafty stuff.  I love that they're so creative!


This summer, once a week, I plan a "special" craft for them to do beyond their buckets of crafts and ideas.


The project this week...freezer paper stenciling! 


If you recall from this post, I recently freezer paper stenciled for the first time and loved it.  It was easy enough so I thought it could be a blast for my 6 and 7 year old.


I picked up some cheap shirts at Walmart for $3.47 each.  I already had the freezer paper and fabric paints.


The original plan was for the kids to draw out their design ideas on paper and then I would make them on the computer or "tweak" them a bit.  But, I decided why "tweak" them or try to make them look "neater".


The girls each drew their design on the freezer paper.  {They chose to make 4th of July designs}


I did the cutting out of the design as well as the prep work.


I gave them the quick "low down" on stenciling...set them up with paint and brushes...and let them go to town.


My opinion is that they turned out really cute {I especially like that they're very "kiddish"}.


They've already asked to do it again sometime.


Thanks for taking the time to stop by!  I'd love for you to "follow" my blog along!
-R.


Linking up to:

Nesting {a year late?} Linen Closet Organization

My hubby is out of town for work this week {which is not abnormal}.  Typically when he is traveling one of two things happens...{1} I go on a late night sewing "frenzy" once the kids are in bed, or {2} I clean and organize like a mad woman!

The latter of the two has happened this go round.  I had every intention of working on several sewing projects.  However, after not being home lately and being on the constant run with all the kids I decided enough was enough and that I needed to catch up on house work.  Plus I've really felt the need to tend to the organization "bug" that has been scratching at me.

Maybe it's because I never had the opportunity to "nest" with my fourth child, or that I never got to really organize after our move???

While {attempting} to put towels away after doing {9!} loads of laundry I came upon this mess...I'm pretty embrarrased to even show it!  I also think that certain little {independent} children are to be blamed for a fair amount of the mess...
{sorry for the quality...taken with phone}

A sudden urge rushed over me {since the littlest ones were sleeping}, and I had to do something at once!

I operate/live/breathe much easier when everything is organized and clutter free.  Am I crazy or alone in this?

I emptied the entire closet.

Sorted.

Threw {and threw...and threw...oh how I L-O-V-E to purge things!!!}.

Made a quick trip to the dollar store for some inexpensive {plastic/bathroom safe} containers.

Found a home for everything.

Breathed a sigh of relieft once all was in place...

Here's the after...it's not going to hit the pages of Better Homes & Gardens, but at only $5 and a little bit of time, it already brings much joy to my eyes.


The waaay tippy top shelf...things I definitely don't want a child to get into...

Next down...a place for everything {labeled with dry erase marker so the hubby has no excuses}...

Towels...neatly in a row...
mommy's - wash cloths - kids

Swim diapers, Hand towels, and tooth brushes at child "access" level...

Hair "stuff"...

 And...our monthly diaper supply...

Thank you so much for stopping by!  Do you have any great and inexpensive ways you like to get and stay organized?  I'd love to hear about them.
-R.